I’ve been working on a small application that eventually will be deployed, so I thought it might be a good time to try Docker. Looking at my options, I could choose AWS, Google App Engine or Azure. Seeing I have an active subscription for Azure, I’ve opted for this one.
Most of what we’re going to describe here though would probably apply for other cloud providers, with the exception of the step where we need to install Docker and upload the container to the chosen provider.
Disclaimer: I’ve just started experimenting with Docker so I might have gotten some things wrong. As such, I’d love any and all feedback.
The App
The sample app is using Wasabi, which is a small experiment in making a simple HTTP framework. Think of it as a ExpressJS clone, except in Kotlin and built on top of Netty, running on the JVM. The code itself is as simple as it gets:
package sample

import org.wasabi.app.AppServer
import org.wasabi.interceptors.serveStaticFilesFromFolder

fun main(args: Array<String>) {
    val server = AppServer()
    server.serveStaticFilesFromFolder("web")
    server.get("/test", { response.send("Test") })
    server.start()
}
Wasabi uses the Gradle Application plugin to bundle up the application, creating a zip file which contains everything for distribution: a bin folder containing a script to start the server and the corresponding lib folder with all the runtime files. In essence running:
gradle distZip
gives me:
    bin\sample
    lib\*.jar
To run the app, all we’d need to do is type
/bin/sample
which would start the HTTP server, listening on port 3000. We’ll need all this for later on, when configuring and running Docker.
Setting up Docker on the development machine
Next step is to get Docker installed locally. I’m using a Mac, so my option for having docker is either a full VM with Ubuntu, or using (boot2docker)[http://boot2docker.io/) which is basically an interface to a headless VM running Ubuntu. To all practical effects, and to the best of my knowledge, it’s pretty much the same thing, and it’s improved quite a bit since the last time I tried it some months ago, so I’m going with boot2docker.
boot2docker
The install process is pretty straightforward. We run the installer and then execute boot2docker. We then need to set some environment variables, which is provided for us on execution.
Full Ubuntu
If opting for the full-fledged Ubuntu, then we’d just install the VM and run:
    sudo apt-get update
    sudo apt-get install docker.io
Creating a Dockerfile for the application
As you might know, Docker Hub provides a series of pre-made images configured with different OS’s, services, etc. While we could download an existing image, install our software and then commit changes, the correct and more persistent way (AFAIK) to do this is to create our own Docker image. For this, we need to create a Dockerfile which contains everything needed to run our application.
A docker image can be based off an existing image. We’re basing it off dockerfile/java:oracle-java8
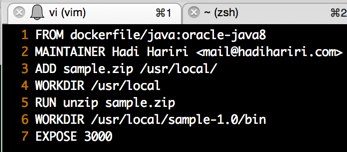
A line by line explanation:
- Creating a Docker image based on dockerfile/java:oracle-java8
- Indicating the maintainer, which is good practice.
- Copying the sample.zip file, which contains the application, from the local file system to the container, in the location /usr/local
- Switching to the working folder /usr/local on the container. This means any new command will be executed from there
- Unzipping the application, which now creates a folder /usr/local/sample-1.0
- Switching to the working folder /usr/local/sample-1.0/bin
- Exposing port 3000 on the server, which is the default listening port for Wasabi.
Building the image
Now that we’ve defined the Dockerfile, we need to build it:
docker build -t="hhariri/sample" .
This builds the file Dockerfile located in the path specified (.), and tags it with ‘hhariri/sample’ which is useful to then reference the image with.
Executing:
docker images
should display our image:

Running the image
Final step before deploying to Azure, is to run the image to make sure it all works:
docker run -p 3000:3000 -d hhariri/sample /usr/local/sample-1.0/bin/sample
Two parameters here that are important:
- -p 3000:3000 indicates the internal port of the app and the external port on which it’s exposed (coincides with the EXPOSE 3000).
-
-d indicates to Docker to run as daemon, i.e. return to the command prompt, providing an ID. We can then stop the service by issuing
docker stop "{ID}"
Deploying to Azure
Once we have it all running locally, next step is to deploy it to Azure. We’re going to be using a Virtual Machine running Ubuntu 14.04. We need to install Docker on the machine. For that we can SSH into it and run
    sudo apt-get update
    sudo apt-get install docker.io
Next step is to copy the Dockerfile and sample.zip to Azure. We can use SCP (thanks Kevin). From our machine:
    scp Dockerfile azureuser@machine:~/tmp
    scp sample.zip azureuser@machine:~/tmp
Once the files are on Azure, we then need to repeat the same step to build the image:
docker build -t="hhariri/sample" .
Running on Azure
We should now be able to run the application from Azure. However, since it’s listening on a TCP port, we need to open the endpoint on Azure, which is done via the Dashboard.
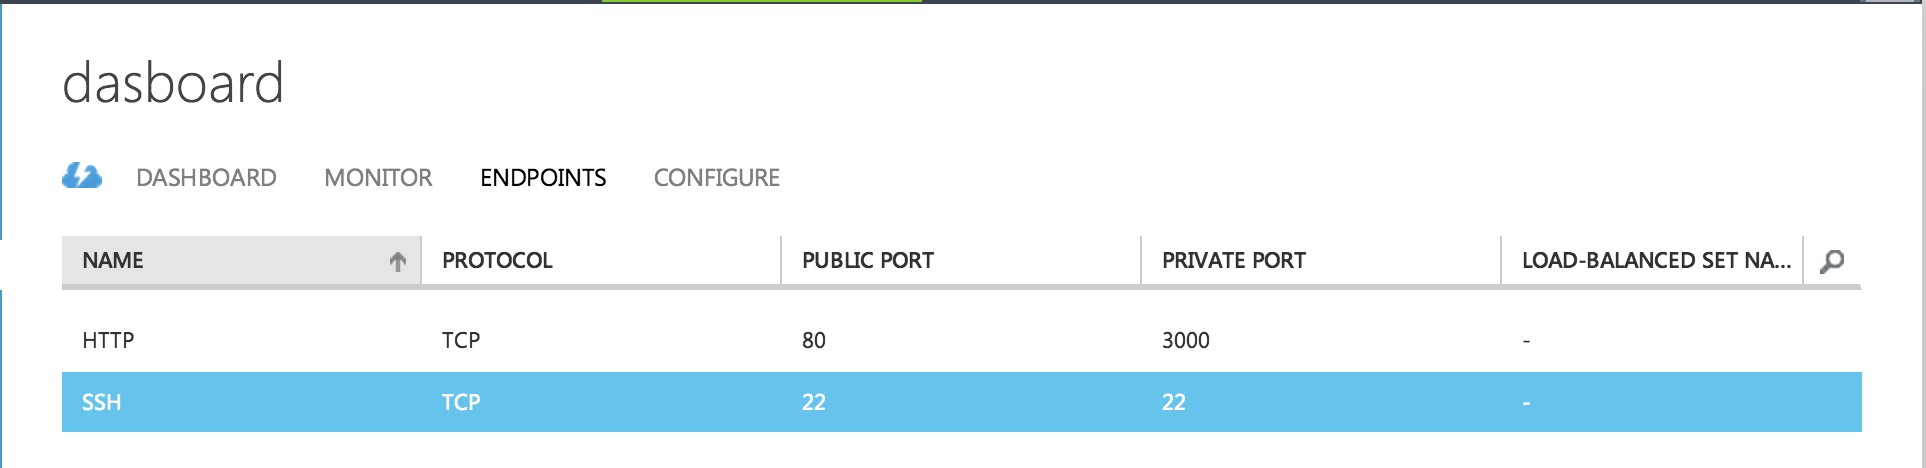
We’re mapping port 80 to the internal port 3000.
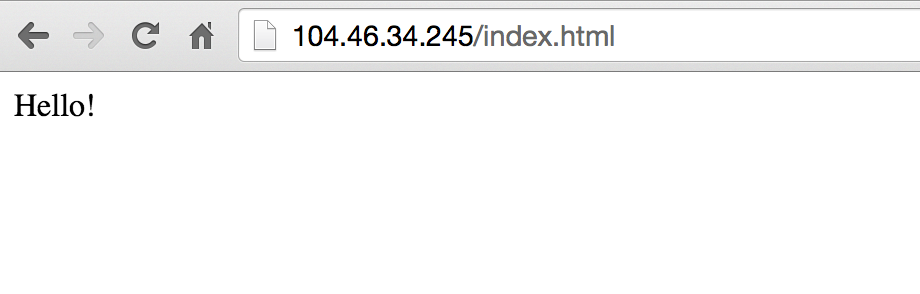
Only thing left now is to start the service:
docker run -p 3000:3000 -d hhariri/sample /usr/local/sample-1.0/bin/sample
(note how it’s still mapping 3000:3000 since the Docker internal port 3000 maps to the external host (Azure VM) of 3000).
Summary
One thing that would be nice is to make the process smoother and remove the SCP manual step. To begin with, the Dockerfile can be uploaded to our repository, on Docker Hub for instance. For the actual application, well that could come off a GitHub repo, blob
storage, or somewhere else. I’ve still not figured out the smoothest way, so open to suggestions.
As for the experience, fighting with Docker when first coming to it can be a bit frustrating, but once you have it all running, it is actually quite nice.