Continuing with Templates, in this post we’re going to take a look at File Templates. Whereas Live Templates allow us to generate interactive code and insert this at the current cursor position, File Templates allow us to do the same but directing the output to a file. Additionally, as we’ll see, they are very useful for creating both standard and custom files efficiently.
If we open up the Templates Explorer via ReSharper | Live Templates, we can see three tabs: Live Templates, Surround Templates and File Templates.
Similar to Live Templates, Files are organized into different categories, corresponding to the type and language of a project. By default the predefined ones include templates for Web Applications (ASP.NET) and generic applications (Console, WinForm, Libraries, etc.). There are also User defined ones as well as Shared Solution and Personal Solution, again similar to Live Templates.
On the right-hand column we have a repeated set of templates. What these allow us to do is customize the usage of templates. However, before seeing that and delving into creating new templates, let’s see how we can use the existing ones.
Using Templates in Web Applications
1. Create a new Web Application (can be MVC or WebForms) to work with.
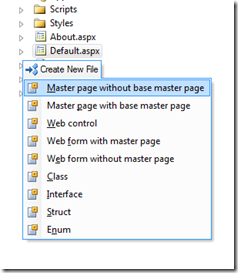
2. There are multiple ways to create new file templates with ReSharper (right-click Solution Explorer |Add | New From Template or via the ReSharper | Edit | New From Template menu). However, by far one of the easiest and most efficient ways is what we introduced in ReSharper 5: Create New File. You can invoke this from anywhere, be it the Solution Explorer or from a file in the editor, by pressing Ctrl+Alt+Ins

[Pressing Ctrl+Alt+Ins in ASPX editor]

[Pressing Ctrl+Alt+Ins in Solution Explorer]
Since this is a Web Application, the list of Templates to choose from include all those that appeared under ASP.NET Projects in the Template Explorer. In addition, since creating a Class, Interface, Struct or Enum are still valid in the context, it will display those too.
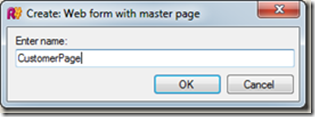
3. Select a new file, for instance Web form with master page and provide it with a name and hit OK (Enter key)
4. Based on the type of file, and in particular the template it contains, we will be prompted for additional information. In this case since we requested a Web Form with a MasterPage, ReSharper prompts for the MasterPage file
5. Select the corresponding master page and hit Enter.
We’re done. With very little effort, we’ve created a new Web Page and referenced the Master Page. Comparing that to the default way of creating Web Forms (or in fact any other item) in Visual Studio, we can quickly see how much more efficient it can be. However, the true power of this lies in it’s customization, not only in the template but also in what templates we can choose from.
Customizing the Files we care about
When invoking the Create New File, the list that appears is customizable, both in regard to the contents as well as the ordering. Imagine for instance that we usually work with MVC applications and Spark View Engine and are not really interested in WebForms. Having things like Web Control or Web Form with master page pop-up only add noise to the options. Fortunately we can eliminate these easily:
1. Open up the Templates Explorer editor via ReSharper | Live Templates and select File Templates
2. Select the element we don’t want to appear when creating a new File Template. In this case we want to eliminate Web Controls and Web form xxxx
3. Click on the red cross (X)
4. Close the Templates Explorer
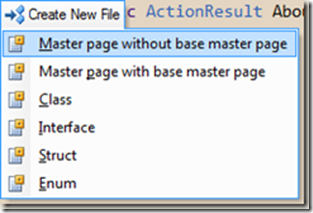
5. Invoke the Create New File menu by pressing Ctrl+Alt+Ins. It should now only display the remaining entries.
Apart from eliminating entries, we can also change the sort order by dragging the entries in the Templates Explorer (right-hand column, same place we selected to delete in step 2) up and down.
Creating new File Templates
Being able to generate templates fast, customize them and edit them wouldn’t be sufficient if we couldn’t also create new ones. Fortunately, we can. Let’s see how we can easily create simple DTO objects that use for instance the DataContract and DataMember attributes.
1. Create a new project. Any type will do.
2. Open Templates Explorer via ReSharper | Live Templates and click on File Templates
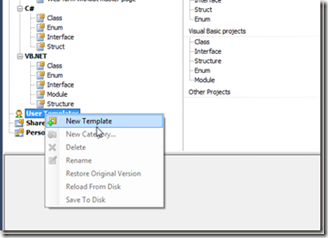
3. Select the User Templates node and right-click to create New Template
3. In the Template Editor, type DTO for the Description and NewDTO.cs for the file name
4. Enter the following in the Editor
We now need to define some macros on the placeholders (variables $nameSpace$, $className$, etc.).
Note: The first [DataMember] property we’ve added is of course optional and more for demonstration purposes.
5. Select the nameSpace placeholder in the right-hand column and for the value choose “Default namespace for current file”
6. Select the className placeholder in the right-hand column and for the value choose “Current file name without extension”
7. Uncheck the Editable Occurrence on previous two entries. This prevents ReSharper prompting us for values
8. Save changes and close the editor
Using the new File Template
We saw that File Templates can be invoked using Ctrl+Alt+Ins (Create New File). However if we do this now, our template will not appear. That is because we need to tell ReSharper we want it on this quick list. We can do this in two ways:
Method 1: Invoke the template using an alternative option, for instance ReSharper | Edit | New From Template and selecting More..
This will bring up a dialog box with other templates:
where we can select our Template. At this point we can tick the CheckBox “Add to quicklist”, selecting the Category from the Dropdown below it.
Method 2: Alternatively, we can drag and drop the template from the Template Explorer to the Category we are interested in (for instance C#)
Either way we choose, from this point on, our template will now be accessible via Ctrl+Alt+Ins:
Summary
With File Templates we can easily create files that are used frequently, such as DTO’s, Unit Tests, Controllers or other common classes we create. In addition to providing an efficient way to create these items, we can also interact with them, just like we do with Live Templates to adapt them to our needs on each creation.


