This is part three of a four part series on Templates:
- Live Templates
- File Templates
- Surround Templates
- Extending Functionality with Macros
Surround templates, as the name indicates, allow us to surround a selection of text and apply a transformation to it. This can be from wrapping some code inside a try..catch block or performing more complex tasks such as iterations.
Surround Template Gallery
As with Live Templates and File Templates, we can view the list of available Surround Templates via the Live Templates entry in the ReSharper menu (for the record, I’ve filed a request for it to be renamed to the more appropriate Template Explorer, so feel free to support my request by voting for it).
The layout is similar to File Templates. The right-hand side column allows us to define a “quick list” of Surround Templates we want available based on context. Like before, we can first see how to use existing ones and then expand them by adding new ones.
Invoking a Surround Template
Like pretty much everything in ReSharper, we can invoke Surround Templates using the ReSharper menu (ReSharper|Edit|Surround with Template) or alternatively and more conveniently via the shortcut, which is Ctrl+E,U if using Visual Studio Scheme (Ctrl+Alt+J for IntelliJ).
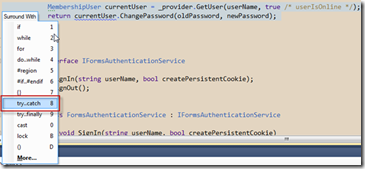
Let’s assume we have some code that we need to wrap in a try..catch block. We first select the line(s) of code, press Cltr+E,U and ReSharper prompts a menu for us to select the specific template. Each entry is numbered, allowing us to quickly make a selection (in this case it would be 8)
The selected part of the code is then wrapped inside the try..catch part (later on we’ll see how this is defined), resulting in:
This is not limited to C# code, but can be used in Visual Basic as well as HTML (ASPX) and XML pages. Take the following text in an ASPX page:
Invoking the Surround Templates provides us with the option to surround it with a tag, link or other constructs. In this particular case, if we select a tag, we’ll be presented with a second menu which allows us to define the actual tag. ReSharper provides a list of all tags currently on the page, but we are free to start typing our own:
as shown here (writing span):
or when iterating over a series of fields, we can invoke the foreach template:
resulting in:
Creating new Surround Templates
Below is a typical MVC Action. We receive a customer and save it to a repository
The data however might not always be valid. That’s why it’s wise to validate it before operating on the data. This is usually done in ASP.NET MVC checking the IsValid property of ModelState:
Let’s see how we can easily make a Surround Template to do this for us, that is go from the single _customerRepository.Save(customer) to the code above*.
1. Open the Surround Te
mplate tab using ReSharper | Live Templates | Surround Templates
2. Create a new User Template, by right-clicking on User Template and selecting New Template
3. Enter the follow text in the Template Editor, giving it the name ModelState:
With Live Templates and File Templates, we generate text from scratch. With Surround Templates, we mostly select existing text and our intention is to work with it. As such, ReSharper offers a series of pre-defined variables that helps us with this task:
| Variable | Description |
| $SELECTION$ | The selected text when invoking the template |
| $END$ | Where the cursor should be placed on termination of template interaction |
| $SELSTART$ | Denotes the start of selected text after template has been invoked |
| $SELEND$ | Denotes end of selected text after template has been invoked |
The new items here are $SELECTION$, $SELSTART$ and $SELEND$, which we’ll see their purpose shortly. As always, anything else in between the $ will act as a variable on which we can apply a macro.
4. Similar to File Templates, in order to make this efficient, we need to add it to the quick list of templates. Drag the newly created template. You can optionally set the filter to C# files only. See previous entry on Live Templates to see how to do that
5. Close the Template Editor.
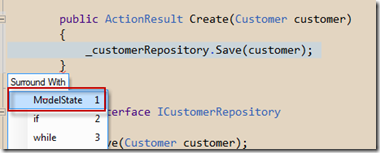
6. Select the line of text we want wrapped in the template and press Ctrl+E,U. Choose ModelState
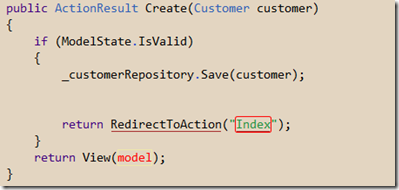
We should now end up with the following:
Refining the template
As it is now, the Surround Template created assumes that we always want to perform a RedirectToAction, which is the norm**. If however on occasions we want to perform some other operation, we can make it easier to replace the default RedirectToAction call by selecting the text. As such, all we need to do is start typing to delete it. We can do this using the $SELSTART$ and $SELEND$ variables as shown below:
This is now telling ReSharper to prompt for the variables, but to ultimately select the entire RedirectToAction for us to replace it if required. If we are OK with this default, we can hit ESC. We also change the order in which the variables are prompted for to make it more convenient.
Summary
Surround Templates offer us a way to conveniently add construct around existing code with ease. They are different than Live and File templates in that the concept of a selection exists. With Surround Templates, we cover the three different types of Templates that exist in ReSharper. In the last part of this four part series we’ll see how we can create new macros to extend the ones ReSharper offers us when playing with variables. This will allow us to do all sorts of things with templates.
Notes
* I’ve used this as an example because it’s all too common to see this approach. Personally however, I recommended using AOP to avoid constant repetitive code duplication across actions.
** This is known as the PRG pattern: POST-Redirect-GET. The reason we do this and not return a View is because if the user presses the Refresh button in the browser, it would act as a new POST. In this case maybe nothing will occur, but think about adding new records for instance. By first performing a Redirect and then doing a GET for Index, a refresh will only cause a new GET of the request we redirected to (in this case Index action).


