This is the final part of a four part series on Templates:
- Live Templates
- File Templates
- Surround Templates
- Extending Functionality with Macros
In previous posts we saw how to create Live, File and Surround templates. We also saw that the Template Editor provided us with the ability to apply macros to placeholders. For instance, in the first post we saw how to set the name of a variable to that of another existing one, with the first letter in lowercase, simply by choosing a macro and applying it to the placeholder.
Despite ReSharper shipping with quite a few macros out of the box, there are always instances when we want something specific which is not available. In this post we’ll see how to easily solve this problem by writing a custom macro.
Creating a custom Macro
The process for creating a custom macro is overall quite simple:
- Create a class that implements IMacro
- Decorate it with the Macro attribute
- Install it as a ReSharper plug-in
1. Implementing IMacro
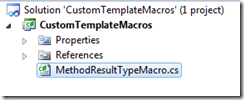
We are going to create a simple macro that merely returns the type of the method it is used in. This not only shows us the basics of creating macros, but helps solve someone’s problem. Let’s start by creating an class library project and adding a class named MethodResultTypeMacro.
The class should implement the IMacro interface. This is declared in the JetBrains.ReSharper.Features.Services.dll assembly (I’ve posted the complete project to GitHub so you can see all required references).
{
public string GetPlaceholder()
{
throw new NotImplementedException();
}
public ParameterInfo[] Parameters
{
get { throw new NotImplementedException(); }
}
public string EvaluateQuickResult(IHotspotContext context, IList arguments)
{
throw new NotImplementedException();
}
public HotspotItems GetLookupItems(IHotspotContext context, IList arguments)
{
throw new NotImplementedException();
}
public bool HandleExpansion(IHotspotContext context, IList arguments)
{
throw new NotImplementedException();
}
}
Depending on what our Macro needs to do, the implementation details of these methods vary.
- GetPlaceHolder returns a string that defines the value of the placeholder. It is mostly used for formatting, and if there is no default value, you can return simply a string such as “a”, which is what the vast majority of OOB macros do.
- Parameters define the parameters that our macro can have. Macro
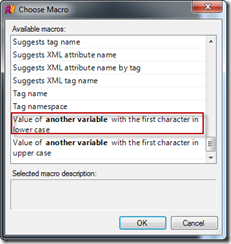
s that have parameters include the one we used in the first post (Value of another variable with the first character in lower case). Macros with parameters have these in bold in the name and description. If our macro does not have parameters, this should return EmptyArray<ParameterInfo>.Instance
- GetLookupItems returns a list of items that will be displayed when a placeholder has focus. For instance, when invoking a Live Template that has a placeholder for a type, this would contain the list of valid types. It returns HotSpot items. A hotspot refers to elements in the template that are placeholders, whether they are editable or not.
- EvaluateQuickResult is called every time a hotspot obtains a value. Often the value of one hotspot can influence that of another. For instance, assume a a macro that provides information on MVC Controllers. Based on the selected controller, the next hotspot which could provide information on Actions would vary. By implementing this method we can update this information. If no additional processing is required, null is returned.
- HandleExpansion is used to perform extra activities on a hotspot. For instance when navigating to a different hotspot. If no additional processing is required, we return false.
Based on the Stackoverflow post mentioned previously, the author wants to be able to create a Live Template that allows him to easily insert a contract in a method that ensures that the return value is not null (this is part of Code Contracts):
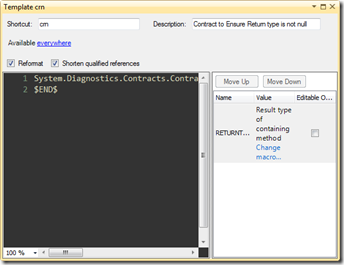
Contract.Ensure(Contract.Result<$RESULTTYPE$>() != null);In order to do this, we would define the following Live Template:
The placeholder we have is the $RETURNTYPE$, which we want to be filled in automatically with the return type of the method where this is declared. As such, what we need to do is implement the GetLookupItems to provide the return type of the method. Below is the corresponding code:
{
var method = TextControlToPsi.GetContainingTypeOrTypeMember(context.SessionContext.Solution, context.SessionContext.TextControl);
if (method is IMethod)
{
var lookupItems = new List<ILookupItem>();
var item = new TextLookupItem(((IMethod)method).ReturnType.GetPresentableName(method.Language));
lookupItems.Add(item);
var hotSpotItems = new HotspotItems(lookupItems);
return hotSpotItems;
}
return null;
}
What we are doing is using the TextControlToPsi class to provide us with information about a possible method the current hotspot is used in. Once we obtain this value, if it is in fact a method, we will then obtain the result type via the ReturnType property. This will return the fully qualified type name. We can obtain a shorter presentation using the GetPresentableName method. We then need to return this as the result of the GetLoookupItems call. This returns HotSpotItems which contains a list of ILookupItem. A specific implementation of this interface is the TextLookupItem which is for regular text values. We thus create a new instance of this class, add it to the list and return this last one.
Since we do not need any additional functionality, the rest of the methods return the default va
lues.
2. Metadata for our Macro
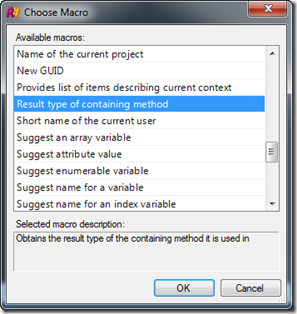
We now need to provide some additional information for our Macro so that ReSharper knows what information to display in the Macro selection box. This is provided with the Macro attribute and has three properties:
ShortDescription = "Result type of containing method",
LongDescription = "Obtains the result type of the containing method it is used in")]
- Name normally refers to the package and macro name. Macros are referenced by this field.
- ShortDescription provides the description that will be displayed in Macro selection box.
- LongDescription provides the description that will be displayed in the description box when selecting the macro.
If the Macro has properties, these can be referenced (and hyperlinks provided to them so that they are clickable) using the syntax {#0:description of variable} where the number indicates the position of the variable. For instance, in the case of replacing one variable with the value of another in lowercase, the ShortDescription would be:
3. Installing the Macro
We now compile the project and place it in a folder un the ReSharper Bin\Plugins folder [See my posts on ReSharper plug-ins for more information]. Once we restart Visual Studio, we should now see the Macro displayed in the Macro selection box. Below is what our Live Template definition looks like. Notice that we’ve made the occurrence of the placeholder non-editable since we are not interested in choosing an option.
Now all we need to do is type crn and hit Tab to have a contract inserted automatically with the corresponding return type of the containing method:
{
Contract.Ensures(Contract.Result<ActionResult>() != null);
Summary
Hopefully you’ve now seen that creating custom macros is not rocket science in ReSharper and opens up a world of possibilities when dealing with Live Templates, allowing us to do pretty much anything. The entire code for the project has been uploaded to GitHub under my Blog repository. Please feel free to use it as you wish.


