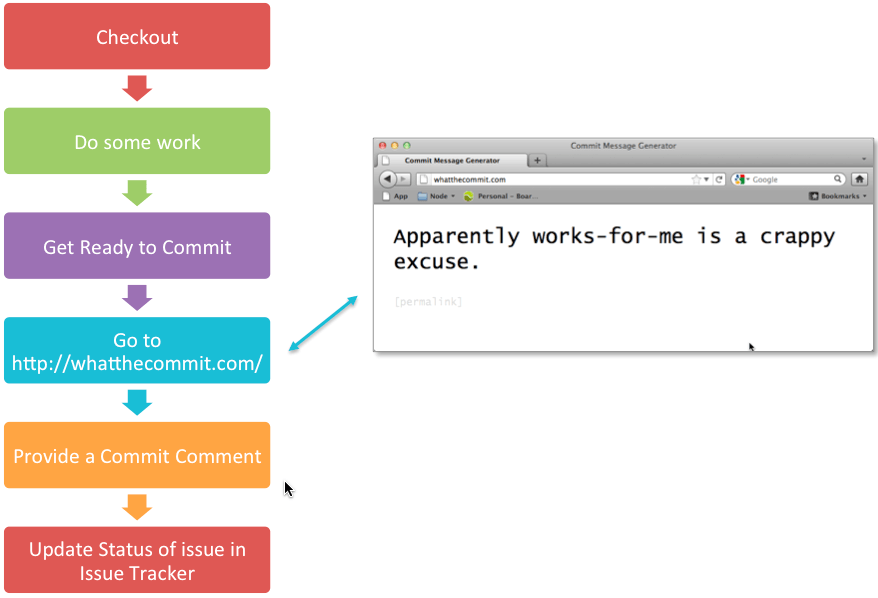
The Typical Developer Workflow

* Thanks to @gregyoung for enriching me with whatthecommit.com
In general, as developers we hate uninteresting tasks such as managing issues, so the less time and effort we spend in tracking bugs and features the better. The worse case scenario is the one outlined in the previous workflow, i.e. work on a bug, comment the fix in source control and then separately manage the issue in an issue tracker. Ideally, we’d like to only have to indicate what we’ve worked on and how it’s related to a check-in once! And fortunately with YouTrack, we can. However, YouTrack goes one step further. It actually allows us to control issues from our source control. Let’s see how this plays out when it comes to using GitHub.
In essence we have two options when it comes to integration GitHub:
- Directly via GitHub Service Hooks.
- Use TeamCity as the gateway, which in itself offers other advantages (opening it up to other VCS’s too). </ul>
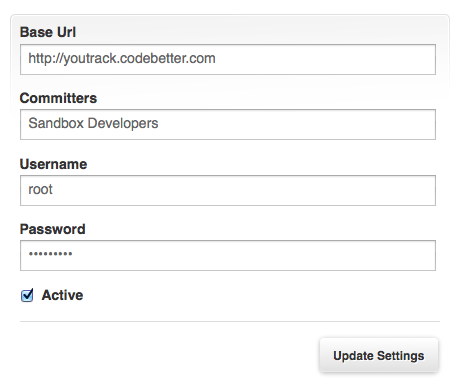
- Base Url is the url of your YouTrack server, which is independent of the actual project.
- Committers is the group in YouTrack that has permission to commit to source code for the particular.
- Username should be a user on YouTrack with Server Admin rights [In an upcoming release this will change to only require Project Admin rights]. </ul>
- The issue’s history has been updated with the date/time it was resolved along with a comment saying it was emitted via commit by hhariri.
- The issue has been actually marked as Fixed.
- The Username is clickable. It has correctly identified the username that checked in and mapped that to the YouTrack user. How does it do know that? Simple. It’s based on the email address. That’s why it’s important to have the correct email address associated with both account. </ul>
We’ll cover each of these in detail.
YouTrack and GitHub Service Hooks
Earlier this year, GitHub provided official support for YouTrack hooks, allowing for tight integration between the two systems. This makes it extremely easy to set up YouTrack for issue management.
Assuming we have a project already set up on YouTrack and GitHub:
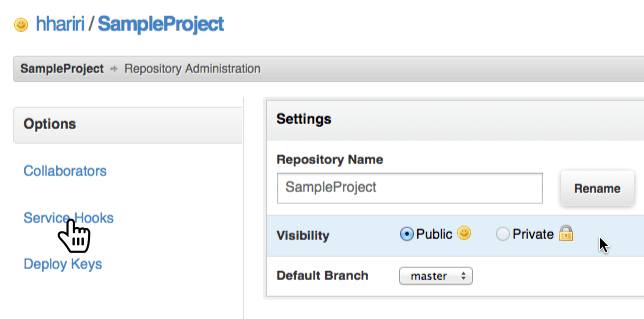
1. Click on the project in GitHub and select Admin
2. Select the Service Hooks from the left-hand side menu

3. At the very bottom of the list of Service Hooks, select YouTrack

4. Enter the following information in the form provided

A few things to note here:
5. Switching over to the YouTrack side, the only thing required is the to create the Committers group and add the correct users to it. This step isn’t required but it’s good practice to limit the users that can update an issue to those associated with the project.
6. A last important step (which is performed once only) is to make sure the REST interface is activated on YouTrack (via the Administration Settings)

Putting it to work – Hello YouTrack Commands
Now that we have the two systems linked up, how do we actually get this to work? If you’re not familiar with YouTrack, you might not know about an amazing feature it has called commands.
When most people look at YouTrack, all the see is just another web application with links to click on. However, the true power of YouTrack is in it’s support for commands, which is basically a way of sending it different pieces of text that it understands. This is normally done using the Invoke Command window (Alt+Ctrl+J…yes YouTrack is VERY keyboard friendly):

We start typing text and YouTrack offers us completion and tries to figure out what we’re trying to do. It’s smart enough that it doesn’t need us to spell things out, i.e. instead of having to type “state: fixed assignee: hhariri”, we can just type “fixed hhariri” and it figures out the rest:

It even remembers recent commands we’ve applied to offer the same combinations to us on the next input.
Now if we take this concept of commands and combine that with the usually useless commit messages we can actually come up with something useful! We can use the commit messages to send YouTrack commands (in fact, with YouTrackSharp I’ve started implementing PowerShell commandlets to allow console support for YouTrack too). As such, from our console our Git GUI we can do the following:

What we’ve done here is provide a command as commit message. We’ve identified the issue we’re going to apply the command to (issue Id prefixed with #) and followed it by the command Fixed.
Once we do this and push it to GitHub, the Service Hooks in GitHub will now supply this information to YouTrack, which in turn parses the command and applies it to the issue:

Notice a few things here:
Multiple Issues
YouTrack also supports multiple issues being updated via the commit message. In order to do this via the commit message, each issue should be on it’s own line (i.e. when using the console, don’t provide the –m option with the commit and have Git prompt you with an editor to input comments).
Also it is important to note that the commit messages are not limited to just the “Fixed” command, but other commands can also be added such as tagging an issue, etc. (comments currently is not supported).
Integrating GitHub (or any VCS) with YouTrack via TeamCity
The second option for integration between YouTrack and GitHub is using TeamCity as the gateway. The advantage to this mechanism (apart from using TeamCity!) is that it now opens the door to more VCS options, including Subersion, Perforce, Git, Hg and all VCS’s that TeamCity supports.
The steps to integrate YouTrack and TeamCity are pretty straightforward:
1. Click on YouTrack Administration and select TeamCity Integration

2. Select to Enable TeamCity Integration and click on the Add TeamCity Server link

Enter the information as described in the dialog box and click Save.
3. Once the server is set up, we now need to define the mappings between TeamCity and YouTrack projects. For that, we click on the define mapping link:

We need to define pretty much all the values in the dialog box (which are self-descriptive).
In addition to the minimum required settings, we can also define restrictions on which groups have access to viewing issues via the Permissions tab, as well define a default command to be set on issues affected by failed builds:

4. In order to get the User Mapping, YouTrack like before uses the Email address. As such, we need to make sure that our VCS is configured to map to email. This is done on the TeamCity side under My Settings and Tools which is located under the Username menu [Note we have now switched to TeamCity]:

We edit the corresponding settings and set the Git roots to use email:
![]()
5. That’s all that is needed in order to get VCS commands working via TeamCity acting as gateway. This will now provide us information and output like the following in YouTrack when sending a fixed command via a commit message:

With this, a new Tab appears on YouTrack named TeamCity which contains information about the commit being made along with a link to the username.
We could in essence stop right here. The next step however is to go full force and get some of the added benefits of integrating TeamCity and YouTrack, this time from TeamCity’s side.
6. Under TeamCity Adminsitration click on Server Configuration and then on the Issue Tracker tab
![]()
7. We now need to create a new connection by clicking on Create New Connection, and entering the following information:

Once we test the connection we can click Create and we’re done. From this point on, we can click on Changes and have drill-down information on issues, link directly to them, etc.
Summary
As we can see, there are two ways to integrate YouTrack and TeamCity. The former requires a little bit less of a setup but is restricted to GitHub (currently). The latter gives us the full benefit of having a tight integration between TeamCity and YouTrack and opens up the door to using any VCS that TeamCity supports.
Most importantly however, the purpose of all this is to streamline the process, making issue management simple, non-intrusive and easy to work with.
[Note: If you’re an OSS project lead, note that TeamCity and YouTrack Integration are already setup on Codebetter.com. Ping me if you need help setting up your project details to take advantage of what’s been explained here].